How do I set the sequence for journal in the accounting app?
To set sequence for journal in Metro ERP's Accounting App, follow these steps:
1) Once logged in, navigate to the "Accounting" module by clicking on its icon in the main dashboard or by using the application menu.
2) Navigate to "Configuration" > "Journal". This is where you can configure your journal sequence.
3) Click on the "Journal" menu to view the list of all journals.
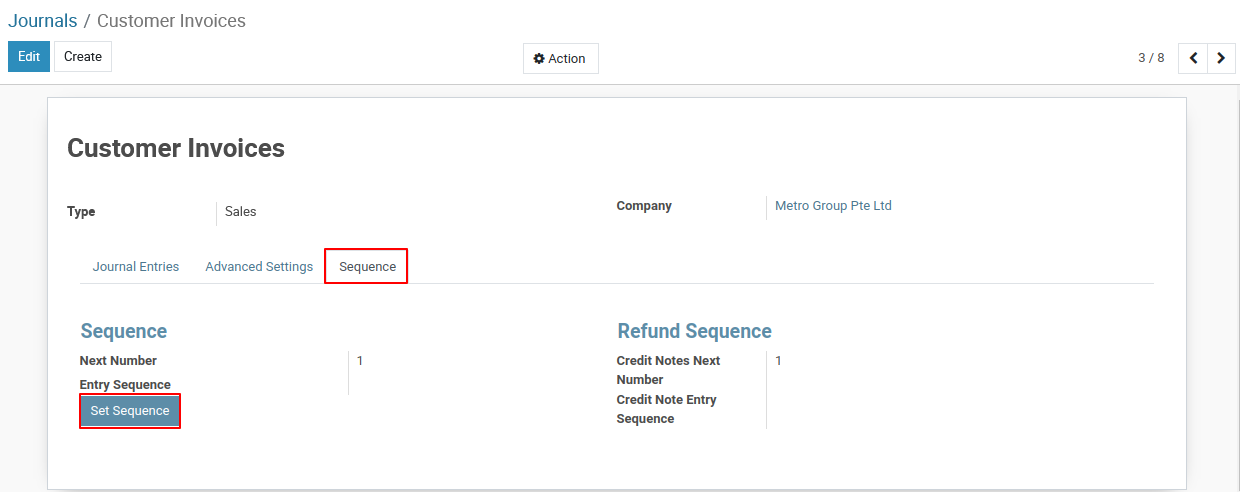
4) This example shows the configuration for the Customer Invoices journal. To modify the sequence for other journals (such as Bills, Cash, Bank, or Miscellaneous), you can follow the same steps. Below is an explanation of each section and field visible in the screenshot:
Journal Name: This field indicates the name of the journal. In this case, it is "Customer Invoices."
Type: This dropdown specifies the type of journal. For customer invoices, it is set to "Sales."
Company: This field shows the company to which this journal belongs. In this case, it is " Metro Group Pte Ltd."
Journal Entries: This tab would lead you to the list of journal entries related to this journal.
Advanced Settings: This tab would allow you to configure additional settings for the journal.
Sequence: This tab would allow you to define and manage the numbering sequence for invoices.
Accounting Information:
- Default Income Account: This field specifies the default account used for recording income. Here, it is set to "300001 Discounts/Refunds - Given."
- Dedicated Credit Note Sequence: This checkbox, when checked, indicates that a separate sequence is used for credit notes.
- Short Code: This field represents a short code or abbreviation for the journal. In this case, it is "INV."
5) Navigate to the "Sequnce" tab and click on the "Set Sequence" button. Now, Entry Sequence should be set on the base of added short code.

6) To change or edit the sequence number: Click on the INV Sequence link in the Entry Sequence fields of sequence tab.
7) This will take you to the Invoice Sequence Settings page, where you can update and manage your invoice sequence number as needed.
8) Edit Invoice Sequence Settings:
On the Invoice Sequence Settings page, click Edit, then configure the prefix/suffix, From/To dates, and set the Next Number for future invoices.
Sequence Code:
This is the internal reference used to identify the sequence in the system.
Suffix:
Optional text that will appear at the end of the generated invoice number.
Use subsequences per date_range:
When enabled, the sequence will restart every year (or per the defined date range). For example, 2025 will start from 0001, and 2026 will start again from 0001.
Sequence Size:
Defines how many digits the number part will have. For example, size 4 means numbers will appear as 0001, 0002, etc.
Step:
Determines how much the sequence increments with each new record. A step of 1 means 0001, 0002, 0003, and so on.
Next Number:
Indicates the next number that will be generated in the sequence. In this case, the next invoice number will be 138 and 140.
9) Save & Apply:
The updated sequence will automatically apply to your next invoice upon creation.
Steps to Edit/Update Sequence for a Journal
To get more details how to set journal sequence, please do contact us at support@metrogroup.solutions